Wednesday, 10 February 2010

Web Page Design for Designers (Beginners)


I first came across this site when I was still a student myself. Albeit a final year degree student. At the time it held some valuable insights for me as a newbie to web design. I was therefore very pleased to find that although the site has been re-designed, a full archive remains of all the articles since 1998.

Although technology has changed somewhat since 1998, the basics of web page construction (HTML, basic principles of good graphic design etc) have not really changed. Consequently this site makes a great place for any web design beginner to start.

While it won't tell you much about the how it will help you a lot with the what and why, and that - let's face it - is where most wannabe web designers fall short. Too much time in the early days is spent learning the technology and not enough time on good design (how to use the technology well).

So web design beginners - start here >

Thursday, 21 January 2010

Play/Pause Button

On some players, when you click play, it turns into a pause button, and then when you click pause, it turns into a play button.

But how can you do this in Flash?

The code is below, but you need to also make the button. So code first, then how to make the button:

var pausestatus = 1;
var position = 0;

_root.playpause_mc.onPress = function () {
if (pausestatus == 0) {
audio_sound.stop();
position = (audio_sound.position/1000);
_root.playpause_mc.play();
pausestatus = 1;
}
if (pausestatus == 1) {
audio_sound.start(position);
_root.playpause_mc.play();
pausestatus = 0;
}
}


The Button

The idea is that we make a button that can change its appearance, not just on rollOver, but depending on whether the sound is playing or not.

There is no automatic function for this in Flash, so we have to write a short ActionScript to do it (see above). But we also need to set-up the buttons so the ActionScript has something to work with.

Here's how:

Make 2 buttons of the same size, with the registration point in the same place for each one. One of the buttons needs a play symbol on it, the other needs a pause symbol.

Then make a MovieClip. The clip needs to have 2 keyframes each with a stop action. Place the play button on the first keyframe, place the pause button on the second keyframe. Make sure they are in the same place, so as you flick from frame to frame the button appears to stay still, and only the icon changes.

On the stage, give the MovieClip the instance name of 'playpause_mc'.

Finishing Up

Add the ActionScript to the first keyframe of the main timeline, and test the movie (CTRL+ENTER).

When you click the button, the icon should appear to change, when you click it again, it should appear to change back.

This is because of this line in the actionscript above:


_root.playpause_mc.play();


In effect, by clicking the playpause_mc MovieClip we tell the clip to move from its first keyframe to its second - the MovieClip plays, it moves to the next frame, but the stop(); action on the next frame stops it - then when we click again we play again, but because there are only 2 frames, so we go back to the first frame.

In this way we switch between the icons.

The rest of the code allows the button to have 2 purposes.

Normally, 1 button 1 purpose. A play, a pause, a stop, a rewind, you get the picture. But this time, we want the same button to play AND pause.

For this reason we have to use an IF statement in our code. We only want the MP3 to start playing IF it is currently stopped. We only want the MP3 to stop playing IF it is currently playing.

The way we do this is to use a variable called pausestatus:


var pausestatus = 0;


In this case 0 means NOT paused and 1 means IT IS paused. Because when we first begin there is NO MP3 playing, we set this variable to 1 - paused - not playing.

When we press the button the first time, we start the MP3:


audio_sound.start(position);


But we also change the value of the pausestatus variable, to tell the script that we are now playing:


pausestatus = 1;


When we pause, we change it back.

By doing this we can then use the pausestatus to decide what we want the button to do when we click it.


if (pausestatus == 0) {
//DO SOMETHING
}
if (pausestatus == 1) {
//DO SOMETHING ELSE
}


Thats the logic.

Get back to me if you have any questions.

Please note, this is not all the code you need for the MP3 player, you still need the menu to choose your track. This just covers play/pause button.

Thursday, 31 December 2009

Happy New Year Students

Here's to a prosperous 2010. A year in which you all get the Higher Education places that are right for you. A year in which things click into place. A year in which you work hard, learn hard and achieve the best you can (the very best you can).

Happy New Year

Thursday, 17 December 2009

How much are your short films worth?

You think it's just the video production unit, you think it's just the 3D animation unit. It may be that to you but, I suggest, it is whatever you make it.

Consider the success of Fede Alvarez, an inexperienced movie producer from Uruguay, who on a tiny £186 budget and with a few others made a 5 minute short, uploaded it to YouTube, and then got offered a $30 million contract to make a Hollywood film.

More on the BBC here: http://news.bbc.co.uk/1/hi/technology/8417789.stm

You can watch the short on YouTube: http://www.youtube.com/watch?v=-dadPWhEhVk


I have thought it, and said it, and I will say it again. The thing that lets most of my students down is not potential, it is lack of effort in realising that potential. I'm not saying that getting a $30 million contract because of your YouTube video happens very often (or ever before), but I am saying you can take your work more seriously. Some of you have won competitions with your work, and yet still fail to remain positive and motivated. What is that all about?

I say, work hard, commit the time, the effort, and then reap the rewards. And that means staying positive and staying motivated.

It's not just the video or 3D animation unit. And the upcoming units are not just web design or just interactive media. Each one is a chance to be your best, and make something that will make others sit up and take notice.

You may not get $30 million, but you can make people take notice enough to give you that university place, take notice enough to offer you your first design job, that promotion.

You may not get $30 million but you can succeed in education and make it in a fruitful and fullfilling creative career.

There are no just units. Each on is an opportunity to show off the very best you can do.

Monday, 7 December 2009

Fading Carousel

The following code supports a fading carousel, allowing you to create a method of looping through a selection of images and fading between them.

Code


var fademode = 0;
var currentt = 1;
var maxt = 3;
var fadespeed = 10;
this.tholder_mc.loadMovie("t" + currentt + ".swf");

this.left_btn.onPress = function () {
if (currentt <= 1) {
currentt = maxt;
} else {
currentt -=1;
}
fademode = 1;
}
this.right_btn.onPress = function () {
if (currentt >= maxt) {
currentt = 1;
} else {
currentt += 1;
}
fademode = 1;
}
//fading
onEnterFrame = function () {
if (fademode == 1) {
//do some fading out
if (this.tholder_mc._alpha > 0) {
this.tholder_mc._alpha -= fadespeed;
}
if (this.tholder_mc._alpha <= 0) {
this.tholder_mc._alpha = 0;
this.tholder_mc.loadMovie("t" + currentt + ".swf");
fademode = 2;
}
} else if (fademode == 2) {
// do some fading in
if (this.tholder_mc._alpha < 100) {
this.tholder_mc._alpha +=fadespeed;
}
if (this.tholder_mc._alpha >= 100) {
this.tholder_mc._alpha = 100;
fademode = 0;
}
}
}


Questions?

For further information contact your tutor.

Two Way Sliding Carousel

As an animation tool Flash makes linear animations really easy just using the timeline. But what if you want animation to run in both directions in response to user input?

There are of course many approaches that can be taken, but here follows the approach used in our online gallery.

The Approach

The main principle behind this interface is to reduce the burden of administration. We don't want to have to do masses of timeline editing just because some of the items in the carousel change.

The other principle is that while the animation can be linear, we can mimic, or fake a two way animation by spliting the animation in half, and using actionscript to jump around the timeline. Thus, the visual effect is uninterupted interactive animation for the user, though the reality is that we are jumping around the timeline.

The Logic

The logic that makes this possible comes from understanding that we can repeat the same piece of animation over and over, but change the item that is being animated using actionscript.

We do this by making a movieclip, that contains a movieclip of a carousel item sliding along. Then we use arrows to tell the movieclip to play (thus making the carousel item slide). At a certain point in the animation, when the item is off the screen we use actionscript to change the item, so that when the animation completes and the carousel item returns to the screen, a different item is displayed.

We do this by telling the movieclip to change the item at certain stages in the timeline using loadMovie.

The Code


var artifact = 0;
var maxartifact = 20;

_root.next_but.onRelease = function () {
if (artifact <= (maxartifact-1)) { artifact +=1; } else { artifact = 0; } artspot_str = "butset" + artifact + ".swf"; _root.aniartholder_mc.gotoAndPlay(11); } _root.prev_but.onRelease = function () { if (artifact >= 1) {
artifact -=1;
}
else {
artifact = maxartifact;
}
artspot_str = "butset" + artifact + ".swf";
_root.aniartholder_mc.gotoAndPlay(30);
}


This is the main engine to make the buttons trigger the animations, and to make the timeline update the carousel item.

Within the timeline, the code to make the carousel update is as follows:


//Increment
_root.aniartholder_mc.artholder_mc.loadMovie(_root.artspot_str,"GET");
gotoAndPlay(1);


And:


//Decrement
_root.aniartholder_mc.artholder_mc.loadMovie(_root.artspot_str,"GET");
gotoAndPlay("prev");


See you tutor for further instructions.

Saturday, 21 November 2009

Hero Help

I'm one of those people who thinks that we all need heroes in our lives. Heroes inspire us, they show us where we can be better, they show us that things we thought were impossible are in fact within our grasp, and they teach us what we need to do to grasp them.

One of my heroes is my Father for many reasons, but one thing I will mention here - he worked hard to support his family, even doing honourable jobs he didn't enjoy because he took his responsibilities seriously. I hope some of that has rubbed off on me. That's what heroes do for us, we hope that by being associated with them that we will be better.

Since you are currently studying 3D animation you might like to become aquainted with some of the heroes of animation. I hope that some of these will inspire you to be better. Better at animating, and better all round.

You can find out more on the Disney Legends website here:

http://legends.disney.go.com/legends/index

One thing they all have in common, like my Dad, not one of them took the easy way out, and that's how they earned hero status. Heroes are not made by looking for the easy path - work hard and one day you may inadvertently be a hero to someone else.

Just remember, it's not about where you are or where you started, it's all about where you are headed. Work to get a little better each day and you will get there.

Wednesday, 18 November 2009

The impact of ergonomics


Any design student, whose task is to develop something that is used by a person should be aware of ergonomics.

Essentialy ergonomics is all about being user friendly, and in interactive media terms that means usability and accessibility.

This BBC article "Five ways ergonomics has shaped your life" (http://news.bbc.co.uk/1/hi/magazine/8363862.stm) makes a good introduction to the concept of ergonomics, and may help you in your assignments.

Questions to ask yourself after reading:

1. What is the main goal of ergonomics?
2. How does this apply to interactive media or web design?
3. How does this apply to my current project?

HND students can make use of this now, ND students may find it helpful in units 104, 105 and 39.

Imagine


Just a short alert for those among you most interested in animation. Imagine is a Journal (magazine) that focuses purely on animation in its many forms. It is available to read in the cluster.

They also have an interesting website full of news about animation, as well as information about animation festivals that you could show your work in.

http://www.imagineanimation.net/?q=news

ColorCode (Amber+Blue) 3D glasses did work with an LCD projector

I have cross posted this from my other blog, because not all my students read that.

I said I would test it out, and the verdict is... yes.

At least, it did with the Dell projector I tried it on. While I initially found that there was more ghosting on the projector image when viewed through ColorCode (Amber+Blue) glasses, than my LCD monitor, at least it was 3D.

I have not yet had success with Cyan+Red at all on a projector.

Changing "Video Mode" improves image

The Dell projector I used allowed me to change the "video mode", which is basically a bunch of different colour level presets. I found that in "game mode" the ghosting pretty much vanished even on the projector.

So there you have it.

ColorCode (Amber+Blue) can work with a projector.

Thursday, 12 November 2009

More on 3D Vision

Just to follow on from my last post about 3D anaglyphs I have produced a series of different kinds of anaglyph so you can get an idea of all the different kinds - you can view the images larger by clicking on them.


Above are the left eye and right eye images for all these anaglyphs.

Red+Cyan Anaglyphs

First, the popular red+cyan, of which there appear to be several variations.

Plain old red+cyan.


Then we have a ghost reduced red+cyan, but I am not sure I can tell the difference with my cheap cardboard glasses.


We also have somthing called Dubois Red+Cyan. But I am not yet sure what the difference is here either.


Yellow+Blue (which looks a lot like Ochre+Blue or Amber+Blue)


Here we have a Blue+Yellow. Which incidentally works with the free Sainsbury's glasses for Channel-4's 3D week, and makes me wonder how similar this is to the ColorCode method in my previous post.


In fact what really tipped me off to thinking that yellow+blue was remarkably similar to ColorCode's Ochre+Blue (Amber+Blue) was this 3D Monsters v. Aliens trailer on the ColorCode website:


Is it just me? Or does that look like a yellow+blue anaglyph?

Click to enlarge if you need to, or you can watch the trailer on the ColorCode site here: http://www.colorcode3d.com/gallery/pages/gal_dwa.htm.

Now, it may be true that the specific algorithm that ColorCode patented is better than the one I had access to. But if this also works good enough on an LCD projector then I will be impressed. A poor man's alternative to ColorCode may be yellow+blue anaglyphs - but don't celebrate just yet, I still need to test it on a projector. Watch this space, I will get back to you on that.

Red+Blue

Red+Blue is a combination I remember from my childhood. Its drawbacks, as you can see, are zero colour transmission - the image is effectively monochrome once the glasses are on, and gives a very dark image.


Red+Green

I do remember reading a 3D comic that required red+green 3D glasses when I was a kid. But the yellow background wasn't part of it. In this example, the image has zero colour transmission too, but the image is lighter than red+blue.


The Winners

It is pretty clear that from the examples above the obvious combinations of choice are red+cyan or yellow+blue. Both of these methods give much brighter images, and allow a reasonable amount of colour through.

On the down-side, both red+cyan and the yellow+blue I used do leave traces of ghosting (when you can still see a faint secondary image of the other eye's view). This is called leaking.

Leaking? For example, through a perfect cyan filter no cyan would be visible, but in my tests some cyan faintly leaks through the cyan filter. In part this leaking is what allows for better colour transmission - but you have to put up with a little ghosting. I had a similar issue with my Blue+Ochre Sainsbury's glasses on the yellow+blue image.

It's a toss up, do you want more colour, or less leaking and resulting ghosting?

For me I can put up with a little ghosting for a colour image.

The Losers

I rejected the red+green filter purely because of the yellow background, that just spoils it for me. Unless you are making a movie about 3D custard this particular example is out. However that doesn't mean red+green is no good - it was used to excellent effect in my 3D DVD of Journey to the Centre of the Earth which did not have a yellow background. So I guess my complaint is not about red+green, but this particular way of combining the image for it - stupid algorithm.

While I reject red+blue it does have one advantage over the others. No colour leakage. With the right filters this means a perfect anaglyph, no ghosting in sight. In fact with red+blue its strength is its weakness. The lack of leaking means perfect anaglyphs, but also means low colour transmission resulting in a darker monochrome image.

I guess you can't have it both ways.

Tuesday, 10 November 2009

3D Week on Channel-4

I posted this on my other blog, but since not all of my students read that one, I have put it here for your interest.

I was at Sainsbury's today (unusual, but I happened to be near one) and came across a big point-of-sale bin thing with loads of FREE 3D glasses in it. Apparently Channel-4 is hosting a 3D week, which according to my 3D glasses arm will feature "never-seen-before archive footage and continue[s] through the week with loads of awesome 3D films and concerts to enjoy".

Anaglyph TV

Now, the image below (from the C4 website) doesn't look like anything special to the naked eye, but when viewed through the special Sainsbury's glasses will take on a 3D appearance. It is an anaglyph.


To view anaglyphs you need special "3D glasses" that have coloured filters. But there are several different colour combinations around, and you have to make sure you get the right one for what you are watching. You can get Red Blue, Red Cyan (the most popular), Red Green and, as I learned today, Blue Ochre (sometimes called Blue Amber, or Blue Brown).

And guess which ones Channel-4 have opted for?

Blue Ochre of course - which means you probably don't have an old pair of 3D glasses hanging round the house which will work for 3D week. Your "Journey to the Centre of the Earth" glasses will not work, and neither will your "Shark Boy and Lava Girl" pair.

Better get yourself down to Sainsbury's and get some Blue Ochre.

But what's with all the different types?

Why not just stick to one type and have done with it? Simply put, different colour combinations have different benefits. Red Cyan is probably the most popular because it allows the creation of both colour and B&W anaglyphs (as does Red Green). Red Blue only allows B&W and the images are very dark.

But more information on the different types can be found here:
http://nzphoto.tripod.com/sterea/anaglyphs.htm

However, and this was news to me until today, Blue Ochre when viewed in a dark room, has better colour transmission than the others. So this is probably why Channel-4 opted for it. After all, if you want people to think that 3D is more than just a gimmick, it needs to look good.

Blue Ochre not free but very clever

While all the other anaglyph colour methods are pretty much public domain, the Blue Ochre combination is apparently patented. Not the idea of the anaglyph - that has been around for too long, you can't patent that - but according to this website it is the method for converting an image for Blue Ochre is patented:

What makes it patentable (the "secret sauce") is the mathematical formula that modifies the luminance of the right eye record and the luminance and chrominance of the left eye record to best transmit the colour information. The darker brown is necessary for balance, because blue is low luminance.

Whilst I haven't read the patent (http://www.patentstorm.us/patents/6687003/fulltext.html) thoroughly, their process doesn't seem to attempt to determine which point in each image represents each point in the three dimensional scene, so it seems to me that they are effectively presenting a luminance-based stereoscopic pair combined with a flat chrominance image based on the average of the two views.

(http://www.dvinfo.net/forum/archive/index.php/t-128661.html)

Apparently this method was invented at the Technical University of Denmark, and has been branded as ColorCode. More information can be found here: http://www.colorcode3d.com/

What makes it so clever, and therefore worth paying for perhaps, is explained on their website:

The ColorCode 3-D system is the only in the world to reproduce high quality 3-D Stereo images and movies with full color- and depth information on all display types.

(http://www.colorcode3d.dk/group.asp?group=39)

And I can't argue with this claim. I know from experience that Red Cyan may work on a CRT or TFT monitor, but utterly fail on a projector. You can also get a fair amount of ghosting. If ColorCode (Blue Ochre) can crack this, it will be worth the license fees for TV companies who want good quality 3D without a trace of gimmick.

I will test my new Sainsbury's ColorCode glasses on the LCD projector at work, and if the result is good I will be very impressed and let you know.

Monday, 9 November 2009

Basic Flash Based MP3 Player

Here is the solution. It turns out you can use NetConnect and NetStream to make an MP3 player in Flash, but only if you encapsulate all your MP3s as FLV files. Not really very helpful since it means converting your MP3 files - it just makes more work.

So, let's use another way. This other way makes making and maintaining the connection with the media easier, but the pausing and playing is just a tad more complicated. Nothing you can't handle I am sure.

The Code

First, here's the code, then I will explain it:


/*set default starting position for playback in seconds*/
var playpoint = 0;
/*create sound object*/
var audio_sound:Sound = new Sound();
/*play button*/
this.play_btn.onPress = function() {
/*play the mp3 from the point defined in the variable playpoint*/
audio_sound.start(playpoint);
};
/*pause button*/
this.stop_btn.onPress = function() {
/*define the variable playpoint as the same as the current position, this is given in milliseconds so we divide it by 1000 to convert it into seconds*/
playpoint = (audio_sound.position/1000);
/*stop the playback*/
audio_sound.stop();
};
this.m1_btn.onPress = function() {
audio_sound.loadSound("track1.mp3", false);
/*true = streaming and therefore autoplay, false = not streaming and therefore just sets the file for when you hit the play button.*/
};
this.m2_btn.onPress = function() {
audio_sound.loadSound("track2.mp3", false);
};


The Explanation

Here goes. First, instead of using NetConnect and NetStream as we did for the video player, we are going to use loadSound. This still gives us a fair amount of control, in some ways more than the NetStream would give us, but it doesn't automatically pause when you play something that is already playing, as NetStream does. So while the rest is no more difficult, just different, pausing and then playing again is slightly more complicated using loadSound.

As with any program, we can only work with the information available, or that we can find out. With the loadSound approach we can find out one very important thing that will help us make a pause/play mechanism - we can find out our current position in the MP3 as it plays. In the code above we do this as follows:


audio_sound.position


Not hard, but on its own it is not a pause/play mechanism. We make it into a pause/play by storing the current position as a variable called playpoint at the time of pause. In effect we remember where we got up to. Then, when we play, we tell it to play from where we left off by asking the variable playpoint to tell us where we got to. As follows:

When pausing:


this.stop_btn.onPress = function() {
playpoint = (audio_sound.position/1000);
audio_sound.stop();
};


First we set the variable playpoint to store our current position. This is actually given in milliseconds so we divide it by 1000 to convert it to seconds - and that's what you see being done here. Then we tell it to stop.

When resuming playing:


this.play_btn.onPress = function() {
/*play the mp3 from the point defined in the variable playpoint*/
audio_sound.start(playpoint);
};


We simply tell it to start, but include the start position as playpoint so it resumes from where we left off.

Isn't that what pausing/playing really is? Stopping, and then starting from where you left off?

The other code is effectively a menu, allowing you to choose which track to listen to. The term false on the end means the track won't play straight away, but will wait for you to press play as well. Change the false into a true and just clicking on the menu will make the track start as well.

Getting late, will add more tomorrow.

NewsFlash! Teacher found not to be a Robot

In spite of a long run of near flawless performance, and an uncanny knack of getting CPUs to do his bidding, the interactive media teacher today managed to demonstrate that perfection is not a pre-requisite to success.

Much to the relief of his students one was reported to say "now we know he is human". Others chuckled as code did not work as expected. But in true form, the teacher used this opportunity to introduce the value of using trace to debug code and find where it wasn't working.

The teacher refused to comment on rumours that he had microchips where his heart and brain should be but simply said "when code doesn't work, it is always user error, you just have to be methodical about hunting down the glitch. I think it is important that HE students sometimes see that code doesn't always work as expected, so they can also see what professionals do to solve problems like this. It's all part of being willing to teach flexibly and respond to what the HE learners want and need - not everything can be planned in advance when teachers are willing to respond to learner requests and the direction the lesson goes, but HE learners gain a lot from it. It's real."

Friday, 23 October 2009

The future of 3D animation is... 3D


If Dreamworks' recent commitment to "true" or Stereoscopic 3D in all future releases sets a trend, then we can hope to expect all 3D animations to be viewable at the cinema with those special glasses.

But there is nothing particularly new about the concept of 3D films, they've been around for years.

"In 1952, television was increasingly keeping people on the couch and out of movie theaters, so Hollywood desperately turned to a process called "Naturalvision," and 3-D movies were born." (Full article on MTV)


What's really interesting is that the recent enthusiasm for producing 3-D movies is for similar reasons - not enough people watching movies at the cinema:

"Stereoscopic 3D (S3D) cinema has proven a surefire way to ignite interest in cinema and get movie lovers off the couch and into a theater seat. the current resurgence in 3D entertainment, marked by increasing numbers of digital cinema theaters and substantial increases in box office receipts when compared to 2D films of the same title, has led film studios to rethink their project lists." (Full article on Intel)


And no small wonder - giant plasma TVs and Dolby 5:1 surround sound has made home viewing exceptionally high quality, and a reasonably high investment for most people. It will take something very special (like stereoscopic 3D) to get people off the couch, away from their expensive telly, and into the cinema.

Technology does not replace creativity

But to succeed this time studios must avoid the mistake of the 1950s:

"Convinced that their best hope to win audiences back was by making things leap off the screen, dozens of 3-D movies were greenlit immediately. But just a few years later, bad scripts and gimmickry had effectively killed the fad." (Full article on MTV)


What do we learn? That people do not come to see technology in action.

Once more we are reminded that no amount of technology will make up for a poor ideas development process.

Perhaps this is why Pixar's latest release was described in this way:

"The reason why "Up" is quite possibly the greatest 3-D movie ever made is because it wasn't designed to be a 3-D film. Rather than throwing gimmicks at the audience, Pixar concentrated on doing what it does best: tell a good story." (Full article on MTV)
And "a good story" is the key to a successful movie of any kind.

Examples

Digital 3D animations to look out for: "Monsters v. Aliens", "Toy Story 3D", "Up". (Note for the indignant: Coraline was not digital 3D, it was Stop Motion).

More information on this topic

Creative Cow Magazine - Stereoscopic 3D edition:
http://magazine.creativecow.net/issue/stereoscopic-3d

About Intru 3D (system used by Dreamworks): http://www.intel.com/consumer/learn/intru3D.htm

Dreamworks CEO demands an all 3D future. Do you? http://popwatch.ew.com/2009/06/19/3d-movies-jeffrey-katzenberg/

Dreamworks animation going 3-D
http://www.bigscreen.com/journal.php?id=553

Dreamworks animation and Intel (PDF article) http://www.intel.com/Assets/PDF/general/VA_Issue2_2009_Dreamworks.pdf

Most notable 3D movies of all time
http://www.mtv.com/movies/news/articles/1622500/story.jhtml


Note to ND Y2 Students

This is one reason why we chose to link unit 121 (3D Animation) with unit 45 (Digital Storytelling). We want you to experience the process of making a short animation that people enjoy - not merely one that is an example of 3D technology.

Having said all that, if stereoscopic 3D is the way it seems to be heading you will need to understand how it works, and how to apply it in your own work. Which is why next week, you will learn how to make 3D animations for 3D glasses - and be given the option of using the technique in your assignment.

But remember, the technique will not make up for poor design and a bad story idea. Using 3D technology in this way is therefore not an easy way to a higher grade - it will demand more from you, not less. But if you think animation is where you want to go, I recommend you give it a shot - great animators were not made, and great grades were not achieved, by looking for the easy way out.

Wednesday, 21 October 2009

Will you be part of the new third world?

Since the industrial revolution we in the UK have believed ourselves to be part of a world conquering super-power. And for a few decades that was true, and we exported "British Made" goods all over the world.

It isn't true any more.

We live in a world in flux. Our stability and future prosperity is not guaranteed. This is down to the actions of individuals. Individuals like you.

You might prosper, while the person sitting next to you might not - purely by making different decisions and having different priorities.

But while individuals are the key to their own success, individuals often still need a reason to change.

In nature individual change occurs through competition with others, and adapting to new environments.

In life the same applies.

Take a glimpse into the future, the up-coming competition, the new environments you will need to adapt to - then ask yourself - "am I doing enough to be ready?":


http://www.youtube.com/watch?v=emx92kBKads&feature=related

One thing is for sure. Change happens! We can prepare ourselves to cope with change, by learning to learn, by expanding our mental faculties and increasing our work ethic, or we can hang back pretending none of what you just saw will happen.

But you know it will, because it is happening now. Ready? Or not!

Your job is to recognise that you can do well in this changing world, but only if you work hard and consistently. Increasingly there will be fewer options available to the lazy or complacent.

Stand up and be counted, and don't let others decide your future. It's all down to what you decide, and how you respond.

The new third world may not be one of geographical boundaries, but boundaries of imagination, work ethic and ability.

Start preparing now by working at your studies - learn to learn effectively - and in future there will be nothing you cannot do.

Tuesday, 13 October 2009

Analysing Interfaces

HND students have been specifically asked to analyse and record a range of tasks using an interface. This must be done before you can identify areas of difficulty or confusion.

But what is the best approach to recording and analysing?

Last lesson I spoke about task analysis.

To help you with your work you should look at the following helps:

http://www.usabilitynet.org/tools/taskanalysis.htm

http://www.ukoln.ac.uk/qa-focus/documents/briefings/briefing-88/html/

http://en.wikipedia.org/wiki/Task_analysis

On Being a Professional

I often ponder the motivations for students choosing to stay in education long after the legal requirement has passed.

For many in Higher Education the motivation is to prepare for employment. But what does that really mean? And do my students really understand what that entails?

In a former life (before I entered the educational world as a lecturer) I was responsible for monitoring and coaching a new and very junior design trainee. Sadly, this particular trainee never quite got beyond the idea that he was doing a job, because at 4:50pm he was already getting his coat on and preparing to leave (most days I would be there beyond 6pm). He failed to understand that having a "job" was one thing, but becoming a professional was something totally different. Needless to say, he did not stay in employment, or in the design industry. Last I heard he worked in a warehouse for a company that has since gone bust.

I share this sorry tale because, at present, I can see a massive proportion of my design students ending up with pretty much the same outcome. They want to be a designer in word only, but their actions speak otherwise. I speak of the ones who never feel stress. For whom missing a deadline is something to shrug off. For whom a sense of urgency is something their teacher has, but who never quite understand why.

One of these students, on hearing when the deadline was, actually said "well that ain't gonna happen".

I compare this to my own response when faced with lots of work but not much time. I immediately begin mentally checking off the non-essential appointments, the things I can cancel or postpone. Then I mentally log the other things that must be done. Then I work out how long I need for the task at hand. Then I work out when I need to go to bed and when I need to get up, to make sure it is done. Even if I lost sleep, even if I had to change plans. In other words, I immediately begin finding a way to get it done, on time, to a good enough standard - and make sacrifices to make it happen.

Then I put in the work.

And that is what it means to be professional. That is what your employer will require of you.

Sadly, when students stay in education in order to prepare for employment, they usually don't have this aspect of their development at the fore-front of their minds. They imagine (if they even have a clear idea of what the future holds at all) that the qualification alone will be enough to get a job, they imagine that somehow magically the fact that they did the course will be enough. But most will fail to become professional, because they resist the very attributes that define professionalism - hard work, sacrifice, commitment, focus, correct priorities, maturity.

These students sometimes exclaim almost incredulously about the shortness of some deadlines, as if such a thing would never happen in real life. Perhaps for them it won't happen, because unless they deal with it, they will never be in a position to get a short deadline, or any deadline at all.

Their lack of professional development will be evident when the course is over. It will show in how they present themselves, it will show in the thin-ness of their portfolio, it will show in their inability to talk intelligently about their work, it will show in the mediocrity and ordinariness of their college work, it will show in the slowness of pace in which they work and their inability to produce quality work at the speed their potential employer requires.

All this because they imagine that professionalism is something they can suddenly switch on when a job interview comes along. But they are mistaken, professionalism is not merely a set of behaviours (like good manners), professionalism is a state of mind, a state of character. Professional is what you are not how you act.

By delaying the decision to become professional until later, my students are delaying the impact a professional approach can have on their grades, and their work, right now.

It is a false move, and one that will cost them dearly and allow more clued up competitors to sweep in and take the prize. I fear that many of my students will literally watch themselves being used as floor rags by the competition while they are only just waking up and thinking it's about time they became professional.

Do the work now. Make the sacrifices now. Be professional now.

To fail to become a professional as a student, is to fail to become a professional designer after graduation.

Monday, 12 October 2009

Olde Worlde Interfaces

It seems to be a common theme at the moment, looking back on the 1980s, but this is where I am going to direct you to explore some older (and much less user friendly) interfaces.

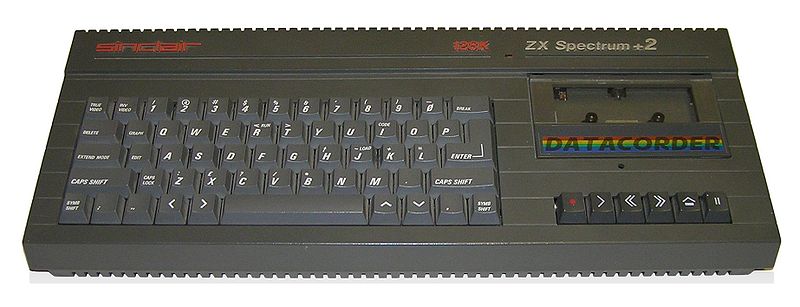
We looked today in class at the user interface for the Sinclair Spectrum +2a.

The "operating system" is non-graphical, has only 1 menu, and apart from that relies entirely on typed commands. Not only that, but the interface is not entirely digital either - since it uses audio cassettes to save and load data, the user must use mechanical switches to start and stop the tape drive manually.

All very archaic and a world away from the graphical user interfaces (GUIs) of our present day.


The homework

Your task (whether you choose to accept it or not) is to use the Sinclair Spectrum +2a interface as a subject for analysis.

You must:

  • Analyse and record tasks performed using the Spectrum +2a.

  • As you do this, identify areas of difficulty or confusion.

You must do the above 2 tasks as you:
  • Load the program I supply from tape - download here >

  • Run the program I supply

  • Play the program I supply

  • Run and analyse VU-3D

  • Run and analyse another game using the system

Get an Emulator

To do this you will need to use a Spectrum Emulator for your PC. I recomment ZXSpin - download here >

If you use an Apple Mac - take a look here >

Hints and Tips

To load the silly game that I provided you will need to type the command:

load "game"

Then press enter.

Because keyboards in 1987 did not have the same standard as keyboards today (especially the Sinclair Spectrum) the " mark is acheived by pressing CTRL+P (not SHIFT+2 as we do today).

Also the SPACEBAR on your PC is also the BREAK key on the Spectrum.

The User Manual

In 1987 the internet was not what it is now. There was no web browser or ISP service for the home user. Any help was gained from the user manual, library books and magazines like Your Sinclair or Spectrum User.

Online versions of the manual can be found here:

View ZX Spectrum BASIC user manual >

ZX Spectrum 128 Manual >

Other information >

Have fun

And that's just about all the help I am going to give you. Welcome to the world of completely un-intuitive interfaces and zero online help. It will be a good experience, and there will be plenty to analyse and find fault with.

As a result you will be more alert to usability problems when you produce your own work.

This will also inform your contextual understanding of current interactive media for unit 5.

Friday, 9 October 2009

It's 3D Season...

Yes indeed, next week my Y2 National Diploma students start their 3D animation unit.

I have been thinking back to how I originally got into 3D. While I tend to think back to my first design job, I can actually trace my 3D experience back to my youth. Some of you will remember the Sinclair Spectrum, fewer of you will have actually used one. But if any of you have actually heard of and used an obscure 3D modelling and rendering program called VU-3D (by Psion software) please leave a comment.

You can try it online here - click>

It really was basic. You started by drawing a profile on the X and Y axis and then you altered the size and position of the profile as you moved it along the Z axis. Don't forget, in all this talk of drawing, there is no mouse, no curves either - these are straight lines between the vertices.

A typical creation of mine would be a drinking glass or something like it. While you are doing this you can't see the model appearing, this is either all guess or gut work, or you have planned it in advance on squared paper. Once the geometry has been produced the next step is to render, and for this it had 3 modes, wireframe (showing every line and vertex), hidden line (removing lines that are abscured by other shapes, and shading (for which you can set the position of the light source in a basic way).

It is truly primitive, but genuinely my first experience of 3D modelling and rendering, way back in the day.

After that I progressed to the 3D Construction kit. Although much better and faster on my friend's Amiga, while I was limited to 8-bit slowness, this did not stop me learning a thing or two about 3D cartesian co-ordinates and working with primitives.

Try it online here - click >

Since then I have used 3D in various guises. Initially a fan of Cinema 4D 4 and then 6, I converted to Carrara Studio because of its intuitive interface and power-to-£ ratio.

But next time someone asks me how long I have been using 3D, I can honestly say a little under 20 years.